The pay later option has become an increasingly popular payment method in the world of eCommerce. While most online retailers typically charge customers at the time of their purchase, there’s a growing demand for virtual wallets or balances that allow customers to add credit and pay for their items in advance or at the end of the month. This is where a pay later system comes into play.
In this article, we’ll guide you through the process of creating a Pay Later System in WooCommerce for your online store. But before we dive in, let’s explore some of the practical benefits that a Pay Later System can bring to your WooCommerce store.
Advantages of a Pay Later System for Your WooCommerce Store
If you’re still unsure about implementing a Pay Later System or need some motivation to make a final decision, here are three significant contributions a Pay Later System can make to your WooCommerce store:
- Encourages quicker decisions: Some customers may take more time to make up their minds about buying something, especially online, due to reduced trust in online shopping. With a Pay Later System, customers gain confidence when purchasing from your store as they can decide now and pay later, fostering a psychological effect that boosts their confidence.
- Promotes customer loyalty and retention: Charging customers upfront for products is the first step in building trust and loyalty. By offering a Pay Later System, your WooCommerce store gains an advantage over competitors. Customers will be more likely to keep buying from you because of the added flexibility and convenience of this payment method.
- Attracts new customers: A Pay Later System can entice potential customers who have never purchased from your store before. For first-time buyers, the option to pay later acts as a promise, giving them a sense of security and advantages from the start, encouraging them to try your products.
Creating a WooCommerce Pay Later System
Now that you’ve made the decision to implement a Pay Later System, let’s walk through the steps to set one up for your WooCommerce store.
Step 1: Get Prepared
Ensure you have WooCommerce installed and set up on your WordPress website. You can easily install the free WooCommerce plugin through the WooCommerce Setup Wizard. For each item you want customers to purchase, create a product in WooCommerce. This may include products like ‘School Lunch,’ ‘Snack,’ ‘School Trip – London,’ or school uniforms with size variations.
Set up payment gateways in WooCommerce based on your preferred payment methods for customers to pay and top up their accounts. Popular options like PayPal and Stripe are recommended for credit/debit card payments and PayPal transactions.
Step 2: Install a Pay Later Plugin
To convert your WooCommerce store into a Pay Later System where customers can accumulate credit and use their balance to pay for orders, you’ll need to install a WooCommerce credit plugin.
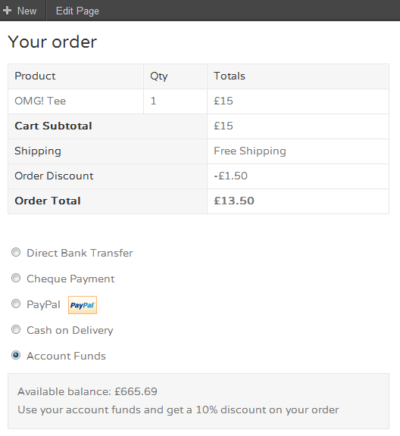
One such plugin is “Account Funds,” which creates an online wallet for customers on your WordPress website. Customers can add funds, top up their balances, and use the balance to pay for orders. If you want to set up an automated monthly payment system for customers to pay off a predetermined amount each month, consider using “WooCommerce Subscriptions” along with “Account Funds.”
Step 3: Set Up Product Table View
Since WooCommerce websites with online balances and credit systems are designed for recurring customers, you may need a different approach from the standard WooCommerce shop layout. Use the “WooCommerce Product Table” plugin to display your products in a rapid order form with quantity pickers, variation dropdowns, and other features. This user-friendly table is more effective for repeat customers who are already familiar with your products.
Step 4: Make Private and Hidden Retail Spaces (Optional)
If you want to limit access to specific customers or create private retail spaces, you can use plugins like “WooCommerce Private Store” or “WooCommerce Protected Categories.” These plugins allow you to hide your shop or certain product categories from public view, giving you more control over who can access certain areas of your store.
Final Thoughts
Implementing a Pay Later System for your WooCommerce store can provide several advantages that set you apart from your competitors and appeal to a broader customer base. Luckily, with WooCommerce, you have numerous methods to create a Pay Later System, as we’ve discussed in this article.
By following our instructions, you can simplify the process of setting up a Pay Later System and achieve outstanding results with your online business. So, don’t miss out on this opportunity to enhance your customers’ shopping experience and boost loyalty to your WooCommerce store.